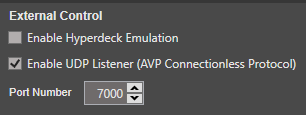
To begin communicating with Legion from an external controller, first go to Global Settings and enable the UDP listener. After which the listener will begin immediately waiting for command strings on the default port number ‘7000’
NOTE: If you find that port 7000 conflicts with other software apps running on the same computer, you can go ahead and change it using the "Port Number" selection control. Once you have completed the change the port will automatically refresh itself and begin listening on the newly assigned port.
The control protocol is in simple ASCII text strings and is not case sensitive. I do, however, use case formatting in the following explanations simply to reflect clean document formatting.
Every command string needs to start with the prefix “AVP”, followed by playlist unit index (starting from 1) surrounded on each side with the pipe character “|” .
Example: AVP|1|
NOTE: If commands are being recived via the AV-Sync Hub and you want all attached play units to recive the same command then use "-1" as the unit index. If you are incorperating a backup node it will treated as if it were just another play unit so even if all you have is one primary and one backup you will still need to use -1 as the unit id in all strings.
Example: AVP|-1|
Following the opening character string, proceed immediately with the command string. Some commands require an additional integer value. Separate the command name and the number value with a comma “,”.
NOTE: If your choosen control software removes commas from all command strings (e.g Universe V3) you can replace the use of a comma with a space " " instead.
Load clip to standby: ‘LoadClip’ + ‘,’ + ## (clip ID)
NOTE: Clip ID is what ever is currently appearing in the clips ID column.
Complete example to load clip third down for the top, that is still using the default ID in the first playlist unit: AVP|1|LoadClip,03
Start playing program: ‘PgmStart’ + ‘,’ + ## (operational flag)
Set the operational flag to ‘-1’ to start the clip currently sitting in standby.
You can also use a clip's ID number to take it straight to program, bypassing the ‘LoadClip’ function.
Note: There will a slight delay when taking a clip straight to program. This is due to the fact that it must still be placed into standby first before it is executed to program.
Example to play clip in currently in preview: AVP|1|PgmStart,-1
Example to load clip ID '2A' and take it straight to program: AVP|1|PgmStart,2A
Stop program: ‘PgmStop’
Complete example to stop clip: AVP|1|PgmStop
Pause program: PgmPause’
Complete example to stop clip: AVP|1|PgmPause
Note: The pause command is a toggle, simply send the command again to resume program play.
Fast forward clip: ‘FForward’
Set the operational flag to the desired faster then normal speed.
The range of speed is entered as an integer value between 1000 to 4000. (1000 = normal and 4000 = 4X faster)
To end the fast forward and resume normal play speed then set flag to '0'
Complete example to start fast forward on the currently selected clip to 3.5X speed: AVP|1|FForward,3500
To end fast forward on the currently selected clip: AVP|1|FForward,0
Rewind clip: ‘Rewind’
Set the operational flag to activate or deactivate rewind. (1 = On , 0 = Off)
Complete example to begin rewind of the currently selected clip: AVP|1|Rewind,1
To end and resume nomal play: AVP|1|Rewind,0
Note: The pause command is a toggle, simply send the command again to resume play.
Set current position: ‘SetPosition’ + ‘,’ + *timecode
*The current position is formatted as a timecode string (‘hh:mm:ss:ff’.)
Complete example to set clip position to 30 seconds and 12 frames: AVP|1|SetPosition,00:00:30:12
Advance to time out: ‘GotoTimeOut’ + ‘,’ + ## (operational flag)
Set the operational flag using numbers 1 to 4 (1=60sec, 2=30sec, 3= 20sec, 4=10sec)
Complete example to advance to 10 seconds out: AVP|1|GotoTimeOut,4
Advance to next tag: ‘NextClip’
Complete example to select the next clip: AVP|1|NextClip
Go back to previous tag: ‘PrevClip’
Complete example to select the previous clip: AVP|1|PrevClip
Advance to next tag: ‘NextTag’
Complete example to advance to next tag marker: AVP|1|NextTag
Go back to previous tag: ‘PrevTag’
Complete example to advance to the previous tag marker: AVP|1|PrevTag
Enable Temp Hold: ‘TmpHold’
Complete example to togle the temp hold: AVP|1| TmpHold
Note: The command is a toggle, simply send the command again to disable.
Enable Temp Loop: ‘TmpLoop’
Complete example to togle the temp looping: AVP|1| TmpLoop
Note: The command is a toggle, simply send the command again to disable.
Clear All Selected: ‘Clear’
Complete example to clear all selected: AVP|1| Clear
Hide Program Output: ‘HidePGM’
Complete example to toggle between whether program output is visible or not: AVP|1| HidePGM
Enable Auto Start: ‘AutoStart’
Complete example to togle the auto start feature: AVP|1| AutoStart
Note: The command is a toggle, simply send the command again to disable.
SEE ALSO